


Experience with automated testing in Visual Studio App Center
Visual Studio App Center by Microsoft provides a virtual swarm of devices to run automated tests on. Here are the lessons we learnt from working with the tool while developing a complex shopping platform app.

We have been developing mobile apps for over 10 years, and it’s totally unacceptable for us to make a product that behaves unpredictably. That is why pumping up our testing team and infrastructure is our top priority.
Hundreds of Android devices, newer and older versions of iOS, and a range of display sizes make QA engineers catch bugs both on real mobile devices and on different operating systems. But hardly anyone can run the same manual scenario on 10, 20, or 50 devices. Challenges like this have taught us to automate testing, especially for mobile devices. But let’s keep it real — creating and maintaining the testing infrastructure, even with 20 real devices, is a big headache.
Luckily, Microsoft has us covered — their Visual Studio App Center service has a virtual swarm of devices to run QA tests on. In this article, we want to share our experience working with the App Center, and some lessons we learned.
Why do we even need it in the first place?
Currently, we are working on a shopping platform app. The project has been going on for quite a while: the customer often adds new features and we have been their only developer. The app has over 10 screens: from “Buy Now” to an array of messages, push notifications, and functions like “shop this look”. And every now and then there is an investor demo or a new mall launch, so the sooner we release (without compromising on quality, of course), the better.
So far, we have been running autotests on a limited range of devices that we had at our disposal (about 30 Android and iOS devices). These days, the number of users has been growing rapidly, and quality is even more crucial. We were confronted with a request to use a cloud service for running automated tests on a larger number of different devices.
While developing and releasing, we like to employ all modern and effective practices, such as cross review, continuous integration, automated functional and modular testing on a long list of iOS and Android devices, analytics, and crashlytics. We have used each of these practices before, separately and as a whole. But with a large-scale project and our extended team, we wanted a catch-all solution, a tool that provides all of the above and offers a one-stop service to manage the development and delivery process for diverse platforms.
Each role in a team had their own requirements. Developers wanted to stick to an established process (a repository, an automated build tool, etc.) and avoid using unfamiliar and unverified tools in the production. QA engineers aspired to drop the testing load on an array of devices. Managers and the customer aimed for a convenient interface with a transparent workflow to track the progress. Could there be a tool to satisfy all of these needs?
In researching available solutions, we considered different options (for example, BrowserStack for Appium tests). Microsoft App Center had a trial period, so we gave it a try and could see what would happen if we cared more about quality and automated the whole mobile application release workflow for any platform with one service. Here’s how it turned out.
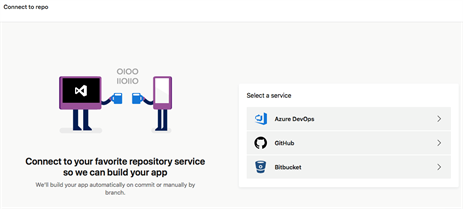
How to set up an iOS app
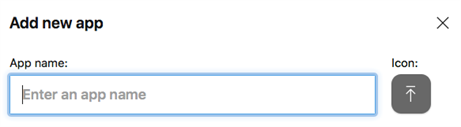
Since the trial period has no limits in functionality, let’s set up a new iOS app in Microsoft App Center:
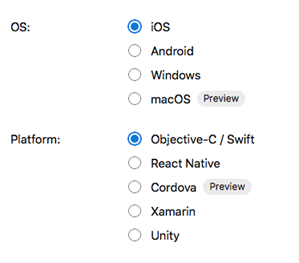
Choosing the platform:
Adding App Center SDK to the project:
pod 'AppCenter'
After installing the pods, open the AppDelegate.swift file and add these lines under our own import command:
      import AppCenter
      import AppCenterAnalytics
      import AppCenterCrashes
In the same file, adding these lines to the didFinishLaunchingWithOptions method:
      MSAppCenter.start("{Your App Secret}", withServices:[
        MSAnalytics.self,
        MSCrashes.self
      ])
The same process works for Objective C, see the full manual here.
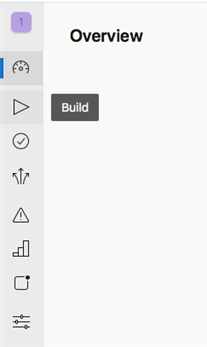
Building!
Open the Build tab and select our service, svc.
Configuring the build. It is important to sign it correctly, since it generates an app format file that can be run on actual devices.
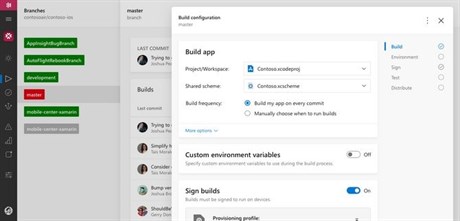

Done! Press “Build Now” button and voilà.
The process for Android apps is similar, read the manual here.
Running first iOS tests
You can include Unit- and native tests for each platform into your build (there’s a tick for that). Let’s look at how automated testing works at different devices in App Center.
Configuring a set of iOS and Android devices and uploading tests
Open the Test tab and select Device Sets. Let’s make a set of devices to run our tests on. You can choose from over 250 Android devices and over 200 iOS devices (generation version + iOS version). See the full list here. A bit disappointing is the fact that the new Apple devices appear in this list in 1-2 months after the sales start (and that’s the official response).
Let’s look how to prepare the tests for upload to App Center (example for XCUITest). App Center allows to build the app only, so test project has to be built locally at your computer or CI.
Shell:
      # Generate an XCUITest bundle and your iOS application as described above.
      $ rm -rf DerivedData
      $ xcrun xcodebuild build-for-testing -derivedDataPath DerivedData -scheme YOUR_APP_SCHEME

      # Upload your test to App Center
      $ appcenter test run xcuitest \
        --app "<app center username/<app name>" \
        --devices DEVICE_SET \
        --test-series "master" \
        --locale "en_US" \
        --build-dir DerivedData/Build/Products/Debug-iphoneos
Appium tests
First, make sure that your used test framework match the ones supported by App Center. Besides, you must use the driver provided by App Center, and that limits the framework use (for example, you can’t use Google Guice).
Building a project for Maven users
Step 1. Add repository and dependency
You will need to add the JCenter repository to your pom.xml file:
XML
      <repositories>
        <repository>
          <id>jcenter</id>
          <url>https://jcenter.bintray.com/</url>
        </repository>
      </repositories>
Then add a dependency for the Appium test extensions:
XML
      <dependency>
        <groupId>com.microsoft.appcenter</groupId>
          <artifactId>appium-test-extension</artifactId>
          <version>1.3</version>
      </dependency>
This code will ensure the enhanced Android and iOS drivers are available at compile time. The enhanced drivers are provided primarily to enable the label feature. See Step 4 for more detail on the label feature.
Step 2. Adding a upload profile
Copy this snippet into your pom.xml in the <profiles> tag. If there's no <profiles> section in your pom, make it. When the profile is activated, it will pack your test classes and all dependencies into the target/upload folder, ready to be uploaded to Test Cloud.
Building a project for Gradle users
Step 1. Adding the repository and dependencies
Check that the build.gradle in the root folder has the JCenter repository activated:
gradle
      allprojects {
        repositories {
          jcenter()
        }
      }
Add the following snippet to build.gradle in the app folder:
gradle
androidTestCompile('com.microsoft.appcenter:appium-test-extension:1.0')
Starting with Gradle 3.0, androidTestCompile is obsolete and replaced by androidTestImplementation.
Step 2. Automating the pom file generation
You will need the pom.xml file to make the uploader work. Add this snippet to build.gradle in the app folder to make the pom file generate automatically:
gradle
      apply plugin: 'maven'

      task createPom {
        pom {
          withXml {
            def dependenciesNode = asNode().appendNode('dependencies')

            //Iterate over the compile dependencies (we don't want the test ones), adding a <dependency> node for each
            configurations.testCompile.allDependencies.each {
              def dependencyNode = dependenciesNode.appendNode('dependency')
                       	dependencyNode.appendNode('groupId', it.group)
                dependencyNode.appendNode('artifactId', it.name)
                dependencyNode.appendNode('version', it.version)
              }

              def profilesNode = asNode().appendNode('profiles')
              profilesNode.append(new XmlParser().parse('https://raw.githubusercontent.com/Microsoft/AppCenter-Test-Appium-Java-Extensions/master/gradleuploadprofilesnippet.xml'))
            }
          }.writeTo("pom.xml")
Changes to the tests
Step 1. Adding imports
Import these packages into your test classes:
Java
      import com.microsoft.appcenter.appium.Factory;
      import com.microsoft.appcenter.appium.EnhancedAndroidDriver;
      import org.junit.rules.TestWatcher;
      import org.junit.Rule;
Step 2. Instantiating a TestWatcher
Insert this declaration in each of your test classes:
Java
      @Rule
      public TestWatcher watcher = Factory.createWatcher();
Step 3. Changing the driver type
Replace your declaration of AndroidDriver<MobileElement> with EnhancedAndroidDriver<MobileElement> or IOSDriver<MobileElement> with EnhancedIOSDriver<MobileElement>
Java
private static EnhancedAndroidDriver<MobileElement> driver;
Step 4. Updating your driver instantiations
Replace the way you instantiate your driver, so that lines in the form of:
Java:
driver = new AndroidDriver<MobileElement>(url, capabilities);
...are changed to:
Java:
driver = Factory.createAndroidDriver(url, capabilities);
Using these drivers will still allow you to run your tests locally without additional modifications, but enables you to "label" test steps in your test execution using driver.label("text"). The text and a screenshot from the device will be visible in test report in Test Cloud.
It is recommended to have a call to label in the @After method, which will include a screenshot of the app’s final state in the test report. A screenshot will be taken, even if a test is failing, and often provides valuable information as to why it does so. An example @After method for a test could look like this code:
Java:
      @After
      public void TearDown(){
        driver.label("Stopping App");
        driver.quit();
      }
Uploading the tests to App Center test
Step-by-step uploading:
-
Generate an App Center Test upload command using the instructions at starting a test run
-
Pack your test classes and all dependencies into the target/upload folder:
shell:
mvn -DskipTests -P prepare-for-upload package
-
Perform upload
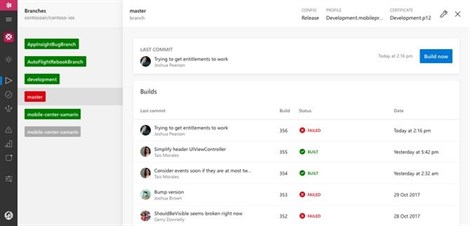
At the end, you can look at the results on each device from the list:
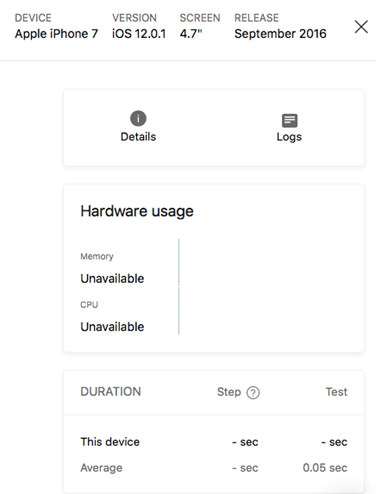
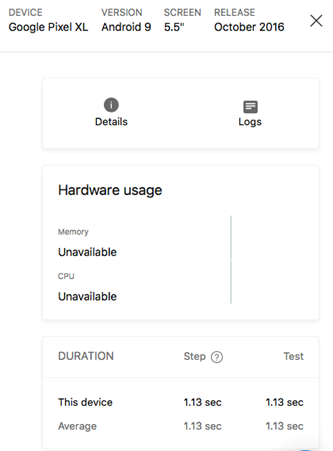
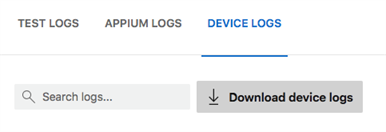
Result screenshots, logs and reports
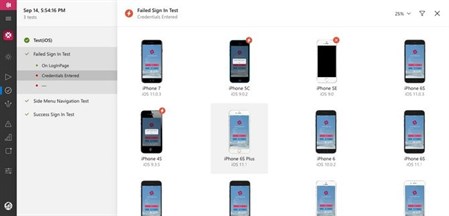
At each of the devices, you can have a detailed log and a screenshot for crashlytics report:
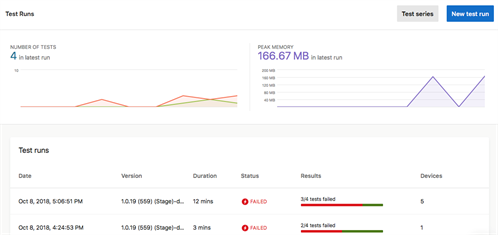
Also, you can see the test runs statistics for a given period:
So far, the most significant App Center disadvantage is that you can’t access the “device” to debug and inspect the results. If something goes wrong with the tests and reading logs is not enough, you have to apply to the App Center support — although it would be nice to get access to a URL and a port to connect to the device if something goes wrong, and maybe figure it out on our own. One of the popular services for automated testing on devices, BrowserStack, has this feature included in Appium.
Conclusion
Conveniently enough, all the application release processes, from Continuous Integration to Continuous Delivery, are now in one place: Microsoft App Center offers CI build, test, deploy to store, analytics, and crashlytics.
Having tried less than half of the functions available in the App Center, our team was impressed. The most obvious advantage is that with App Center you don’t have to support each and every device with code. Other perks include:
-
No server needed for a swarm of devices
-
No hassle connecting all this swarm to the server
-
No dealing with Android glitches when it’s been running 24/7
-
No containerizing each device and managing those containers
-
Not being limited by emulators.
Microsoft App Center is a nice fit by initial parameters: while not being demanding in terms of integration, it provides all of the functions needed and spares the support routine. We are going to use it for real development tasks as it is a great tool to ensure quality.
WaveAccess was listed among the Top United States Software Developers
Let us tell you more about our projects!
Сontact us:
hello@wave-access.com


